
Introduction
One of the features of a public radio station, like it or not, is that it generally has a limited budget – and that often translates to a limit on the field equipment and production gear/facilities that the station can have on hand. As most of that equipment budget goes toward the necessary tower/on-air gear that keeps the station running, there is usually not a lot left over for the equipment that is used in recording and producing shows. Add to that the fact that KSQD, as a new station, will have even less budget to go around, and that the space allocated to the production room is fairly limited and probably cannot house multiple shows being produced at a time (and, well, the fact that the studio doesn’t actually exist at the time of writing this), and it’s a safe bet that demand for production equipment will outstrip the supply available at KSQD.
The good news is, with advances in technology, it’s become feasible to do a lot of (if not all) production work independently, on more devices than ever before. If you have a relatively recent smartphone, tablet, or laptop, you already have a potential portable studio that can record audio, and then (with the right software and apps) edit, mix, and produce multiple audio tracks into complete shows. Or, if you want to split the recording and editing, most home desktop computers can serve as reasonably powerful audio workstations. Even better, most or all of these tasks can be done with software that is either free, or low-cost.
In this guide, I will walk you through options for recording, audio editing, and production (digital audio workstation) setups for both Mac/PC, and a discussion of similar options on an iOS device (smartphone/tablet). As I am relatively unfamiliar with Android, I will not be able to offer specific recommendations for that platform, although searches on their app stores will likely yield similar options (and if anyone who does know this app ecosystem wants to write up a guide for it, let me know and I will include it here).
Recording – Physical
The most basic type of recording you can do is a single-source recording (think one reporter with a microphone pointing it back and forth between themselves and the subject). While this probably is better suited for shorter interviews, it’s the simplest to arrange: all you need is one source for recording (a smartphone is ideal here, but you can use anything that captures sound, such as a tablet or laptop, or a digital voice or audio recorder if you happen to have one on hand).
A more comfortable style, better suited for a sit-down interview, is to use multiple recording sources. To do this at no extra cost and with devices you may have on hand, you can use a combination of sound sources: a pair of smartphones, a smartphone and a digital voice recorder, etc.
Another cheap (but not free) option, if you have an existing laptop, is to get a pair of USB microphones and connect them in to an audio recorder or DAW on different channels to record simultaneously. $40-60 will get you a pair of inexpensive USB microphones online, although it does take some familiarity with sound routing on your computer to set up this recording option.
You can also look at a microphone like the Blue Design Yeti (https://www.bluedesigns.com/products/yeti/), a popular choice for podcasting, which has a unique feature of offering multiple pickup patterns: it can be used to record a two-person interview by setting it to bi-directional mode, or a group interview in omni-directional mode. However, as its pricing starts at $130, it doesn’t quite fall in the inexpensive category with other dedicated microphone options, but does provide the convenience of an all-in-one design that makes routing and recording the sound much easier.
For the best sound quality and convenience, there is the possibility of a multi-microphone setup that can be recorded via an external interface, but this is considerably more complex and does not have a free option. That being said, it can still be done fairly cheaply, with an existing laptop, a set of inexpensive lapel or other microphones (also ~$40 online for a pair), and a USB audio interface that can pair them with the computer (this can also be done fairly cheaply if you get microphones with packs that provide their own power; you can get a Behringer UCA202 2-in, 2-out interface for ~$30, which I’ve used myself for some years with little to no issue).
For more powerful microphones that require phantom power, or for pre-mixing on a dedicated mixer board before going into your recording device, the costs can go up rapidly, but there are still some affordable options (for example, the Behringer XENYX 302USB provides an XLR jack with phantom power, along with headset and other microphone/input connections and a USB audio interface for ~$50, and there are other similar options, including some small mixers, from $30-100). Another, more portable option is to get a dedicated field recorder that supports multiple microphone connections, but at $120 and up just for the recorder, and much more for true multi-microphone versions, that is beyond the scope of this guide.
Recording/Audio Editing – Software
The software used for recording will depend on whether you are using a smartphone/tablet, a laptop/desktop computer, or a digital audio recorder (which will use its own built-in software and interface). We will cover some options available on the computer first, and then iOS.
Mac, Windows & Linux
While it may not have the prettiest interface, Audacity (https://www.audacityteam.org) is perhaps the most widely recognized free audio recording and editing software available. Free to use and open-source, it’s available for just about any operating system you want, and supports loading in effects plug-ins for additional audio filtering, including some capabilities for noise reduction. On the editing side, it has a fairly standard interface, with easy scrubbing and copy/paste editing with unlimited undo, and an envelope tool for smooth transitions.
Another entry in the free, open-source category is Ocen Audio (https://www.ocenaudio.com/features), an editor I came across fairly recently, which has some interesting options including real-time preview of EQ and gain effects, multi-selection audio editing, and a nice spectrogram view for audio analysis. As both these two options are free, I would recommend downloading both, and seeing which one you like better (and if you do like them, consider making a donation to help with their development).
For a more automated (albeit not free) approach, you can take a look at Auphonic Multitrack Processor (https://auphonic.com/multitrack), which is capable of taking multiple audio tracks, processing them for levels, noise reduction, and dynamic range, and automatically mixing them into a complete track. However, it’s less flexible (as it doesn’t allow for much manual editing), and it costs $89 for a noncommercial license. It might be worth considering, though, if you’re looking for an easy mixdown once you’ve done some initial processing in another audio program, and have simple enough source material that you don’t need the sequencing capabilities of a DAW to put it together.
Many Digital Audio Workstation (DAW) programs can also do audio recording, although they usually don’t have the same sort of audio editing suite as dedicated programs like the ones above. I’ll talk about DAWs more in the mixing/production section.
iOS
Modern versions of iOS come with a recorder built in, titled Voice Memos. It’s pretty bare-bones, but it will get the job done – it will record audio from the phone’s built-in microphone, and provides some limited select/trim editing. While it’s not built into the phone, and takes over a gigabyte of space to install it, GarageBand is free to use on iOS and also has a nice recorder with a number of options and built-in effects while recording. However, it’s primarily a DAW (and one of the few that can run well, or at all, on an iPhone), and I will be covering it more in the mixing/production section.
As one might expect, searching for an audio recorder on the App Store produces quite a number of results, most of them “free” with in-app purchases. If you’re willing to pay $5-10 or so to upgrade to full-featured versions, there are plenty of options available, with Recorder Plus II seeming full-featured and highly rated. I personally use a program called AudioShare that I purchased for about $5, which has a fairly robust recorder with a VU meter, and the ability to filter audio through other effects programs. Another similar program I also use on occasion is called “Awesome Voice Recorder Pro”, which I thin also costs $5 or so, and has a fairly nice editor and the ability to replay recordings at different speeds.
There are, however, some actually free options that may do the trick, although I haven’t tested them extensively: “Voice recorder – Voz” and “Voice Record – Memos,Recorder”. By “free,” this usually means “ad-supported,” with ad banners along the bottom or top of the program. While they have a few interesting features, I’m not sure whether they’re compelling enough to recommend over the tried and true Voice Memos program.
For a more professional package on iOS, there aren’t a whole lot of choices – although for fairly full-featured editing you can try the TwistedWave Audio Editor ($10). Not as powerful as a desktop program, but it does have a decent amount of effects and touch-editing tools.
Mixing & Production – Software
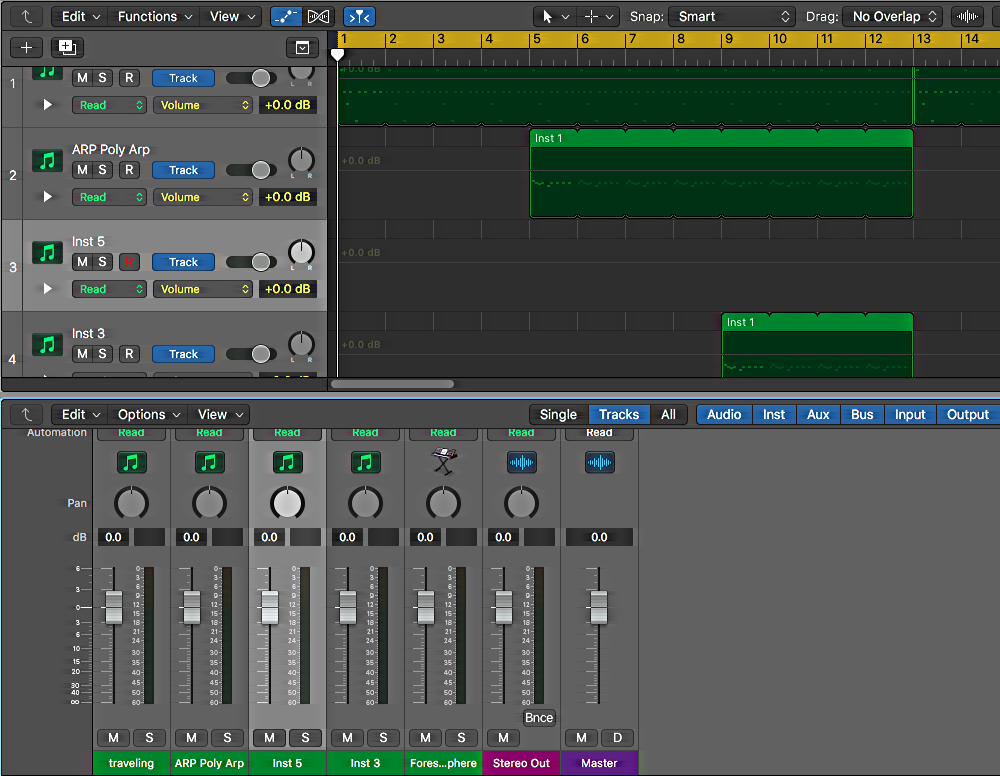
While it is technically possible to assemble multiple audio recordings into a produced segment or show using an audio editor, it is much easier to do so using a Digital Audio Workstation, or DAW. As opposed to an audio editor, which usually lets you work on a single audio file at a time, a DAW allows you to sequence and mix multiple tracks of audio, apply effects, and create complete, produced audio. However, as they can do a lot more, they are also considerably more complicated to work with, and can often command a considerable price (like the software shown in the opposite image – in this particular case, Logic Pro X, which while very full-featured, is Mac-only and costs around $200).
That being said, there are also some free and low-cost options available that give you more than enough capability to produce a complete radio segment or program (and they’ll also let you create your own music, if you’re interested, but in this guide I’ll be focusing more on their radio production capabilities). The programs I’ll be mentioning here range anywhere from totally free (with some account sign-ups) to well under a hundred dollars – and in some cases even come as a native part of your OS or as a free, included install.
Cross-Platform
First, let’s talk about some DAWs that you can use regardless of which OS you’re running – all of these will run on at least Mac OS and Windows, and some additional ones also run on a number of common Linux distributions. (Note that while there are even more options than the ones I am listing, such as LMMS and FL Studio, they are geared far more towards sequencing instruments for music production and do not provide adequate support for the kind of audio work needed in radio production.)
Following on from the open-source programs in the previous section, the first DAW I’ll mention is Ardour (https://ardour.org), an open-source workstation that is technically free – if you want to take that open source code and compile it from scratch, which is generally beyond the reach of anyone not skilled in compiling their own software. (If you are using Linux, though, your distribution may have a precompiled package that you can install from your regular installer.) To get a pre-built version of the software that will run on your system immediately, payment is required – the developers recommend a $45 payment in order to support continued development (and get support and downloads for version updates), but you can download the current version for as little as $1 per OS you want to use it on.
As DAWs usually have so many different features that it would be impractical to cover them all, I’m mainly going to link to their own features page for a detailed description of their capabilities (https://ardour.org/features.html) along with a few of my own impressions. In this case, Ardour has a mainly single-window editing interface, with separate mixer and routing windows. Overall, it has an interface that has a generally similar layout to Logic Pro X, which is a layout I generally like as it keeps things fairly straightforward, though it has its share of quirks (for example, having to bring up a mixer window to load audio effects onto a track). One thing to keep in mind is that it is an in-development open-source project, and while it has made major strides in its capabilities, it can still in some cases be a bit technical to set up (especially on Mac OS, as there can be some tweaking necessary to get Ardour to work with a mac’s built-in audio interface), and it has a functional rather than attractive interface. Still, it gives you plenty of features to work with, and the price is more than reasonable.
Another long-running and highly flexible DAW is Cockos Reaper (https://www.reaper.fm). It is very lightweight (its installers are less than 20MB) and reasonably resource-efficient, and available for Mac OS and Windows (with “experimental” Linux support). It comes with an unrestricted 60-day trial, and a license for nonprofit use costs $60. (full feature list: https://www.reaper.fm/about.php) Overall, it’s extremely flexible in what it allows you to do, and it offers a lot of customizability to make it work the way you want. This is a double-edged sword, though, as that level of flexibility can be confusing at first, but like Ardour it has an extensive and enthusiastic community to offer advice and pre-built customization templates for various workflows. (Also, see: a Udemy course on basic Reaper – https://www.udemy.com/audio-editing-basics-with-reaper/)(Youtube basics video on using Reaper for radio production: https://www.youtube.com/watch?v=ULkH7FHv3IA)
In addition to those, a newly developed free daw released in 2018 is SoundBridge (https://soundbridge.io, URL also contains feature list). Developed by Soundbridge Academy and used as a teaching tool in their audio certification programs, SoundBridge is designed around a streamlined, mostly single-window interface. It is, as advertised, fairly easy to use, with a drag-and-drop plugin matrix and easy access to commonly-used features like automation of common track parameters (volume, pan, etc.). Like most options on this list, it loads readily available VST audio plug-ins, although it should be noted that the Mac version does not load the standard Mac plug-in format, AudioUnits. Also like most options, it requires registering an account on their website to download the free software (although it also comes with a bonus software drum machine, if that interests you).
If you’re looking for some more completely free options and don’t mind some feature limitations or slightly outdated software, a couple of DAW software companies have put out free versions of their products – and unlike most commercial workstation demos that are time-limited or only allow a few tracks or plugins at once, these are complete DAWs with a full suite of standard features (albeit lacking some of the more specialized ones in the full releases, but more than enough for most production needs).
The first one of these is Tracktion 7 (https://www.tracktion.com/products/t7-daw). The company has continued to develop Tracktion under its new Waveform brand, now on version 9, but instead of discontinuing the old brand, they released Tracktion 7 completely free (although you do need to register an account on their site to download it). It will run under Mac, Windows, or Ubuntu Linux, and is another fairly streamlined, all-in-one-window interface. It does have a somewhat… unique workflow, though, and things are often in different positions than they are in more “standard” DAWs, so it can take some getting used to (especially if you’re familiar with other production software). However, it does offer great project overviews and the audio editing and arrangement is fairly easy. It does have plenty of useful features, including very flexible automation (for fading between audio clips, for example) and unique features like applying effects per audio clip rather than the entire track. If you can get past the idiosyncratic interface, it’s quite a capable production studio for free.
One I don’t have much experience with directly is Studio One 4 Prime (https://shop.presonus.com/products/new-noteworthy/Studio-One-4-Prime). It’s another all-in-one interface style, requires account registration to download, and supports Mac and Windows. It’s a up-to-date version of their main product, albeit with a considerably cut-down feature set (see: https://www.presonus.com/products/Studio-One/compare-versions). That being said, it does offer unlimited audio tracks and effect channels, and good compatibility, so it should be more than adequate for radio production.
In fact, if you want to use a DAW for basic audio editing, I’ve come across another recent option that doesn’t even require you to install any software at all. So long as you have an account with them and the Chrome (or a Chromium or other Chrome-variant) web browser, you can load up Amped Studio (https://ampedstudio.com/) to sequence and produce audio directly on the web via their web application. The free version has certain limitations (see https://ampedstudio.com/pages/pricing), but if you’re just looking to do some basic audio arrangement with crossfades, it may do the trick. As it is based on Chrome technology, it may also be possible to load it up and use it on a Chromebook.
There is one more DAW that is probably worth mentioning here, due to its specific focus. Journalist, by Hindenburg Systems (https://hindenburg.com/products/hindenburg-journalist#/Comparison), is something of a hybrid between a multitrack audio editor and a DAW, but rather than being general purpose (for audio, music production, etc.) like the other entries, it is specifically designed around creating a workflow and offering tools dedicated to podcast and radio production. As such, it comes with some interesting features, like recording from multiple microphones at once, built-in noise reduction, automatically adjusting sound levels to broadcast standards, and a voice profiler tool to automatically boost interview audio. The downside is that most of those advanced tools aren’t included in the basic version, which at $95 would already be the most expensive DAW in this lineup – to get them, you would need the Pro version, which is nearly four times that price. (If you’re looking to go higher in budget and have a Mac, you might consider saving half the cost and upgrading to Logic Pro instead, which also comes with a lot of extras, built-in effects, and a huge library of music loops and audio for background effects.) That being said, if you want to take it for a spin, there is a 30-day trial, and an option to rent the Pro version for a couple of months for $20.
Mac
While not incredibly full-featured, an easy choice on most Macs is GarageBand (https://www.apple.com/mac/garageband/), since it’s probably already installed (it has been with the last several OS versions on Mac hardware). The current version works something like a very stripped-down version of Logic Pro X, but it’s still in wide use for podcasting and audio production. The simplified interface does make it fairly easy to use, and if you have a Mac, you may have already played around with it and gained some familiarity – in which case you might as well use it, as opposed to learning a completely new system.
Windows
Before we get started with Windows, a quick note: unlike MacOS, which has certain audio components built in, sound card drivers for Windows do not always contain the input and output port management that is necessary for a modern DAW to work (this is especially the case with sound cards that are integrated with the motherboard, which make up the vast majority of sound cards today). If your sound card drivers do not offer this support, you can download ASIO4All (http://www.asio4all.org), which provides universal drivers to implement this functionality. (If you are using an external USB audio interface, the drivers that it uses may also be sufficient for your DAW to operate).
An interesting recent addition to the collection of free DAWs is Cakewalk by Bandlab (https://cakewalk.bandlab.com). Like some of the previous entries, it’s a version of a well-known commercial workstation (Cakewalk Sonar), but unlike the more cut-down versions, this is a full, unlimited, previously top-tier professional-level DAW available for free. It has a very traditional interface, but a tremendous amount of capability. That being said, the only way to install it is through Bandlab’s “helper” application, which will want to run itself on startup (but this can be disabled). It will also require registering a Bandlab account.
iOS
Yes, if you are determined enough, you can load up a DAW on your phone or tablet, and produce the entire segment on mobile. I wouldn’t necessarily recommend it, but if you want to go this route on iOS, again the choice is easy: GarageBand. It’s a bit different than the desktop version, and isn’t preinstalled (you’ll have to seek it out in the App Store), but it is completely free if you own a reasonably recent iOS device. It has most of the features you need, including a built-in microphone processor effect, and can load up any AUv3 plug-ins you have installed on your device.
There are other DAWs available, but they usually cost money, and many only work with an iPad, although this is changing with the advent of larger phones. A couple I know of are BeatHawk, which is $10 plus in-app purchases, and seems more directed towards music production than general audio sequencing, and n-Track Studio, which is subscription based or costs $30 for a one-time purchase, but seems more geared towards working with audio. There is also a relative newcomer, Audio Evolution Mobile Studio, also for around $10 with in-app purchases, which features a fairly straightforward interface. All of them now have AUv3 support. Keep in mind, though, that getting audio files into and out of mobile DAWs can be trickier than it is in the computer versions.
That being said, a lot of audio software on iOS doesn’t support AUv3 yet, so if you want to use other audio software programs with GarageBand, you will need something to bridge them together. Some can do this automatically via Inter-App Audio, and others can be routed to GarageBand using software such as Audiobus 3 ($10) or AUM ($19).
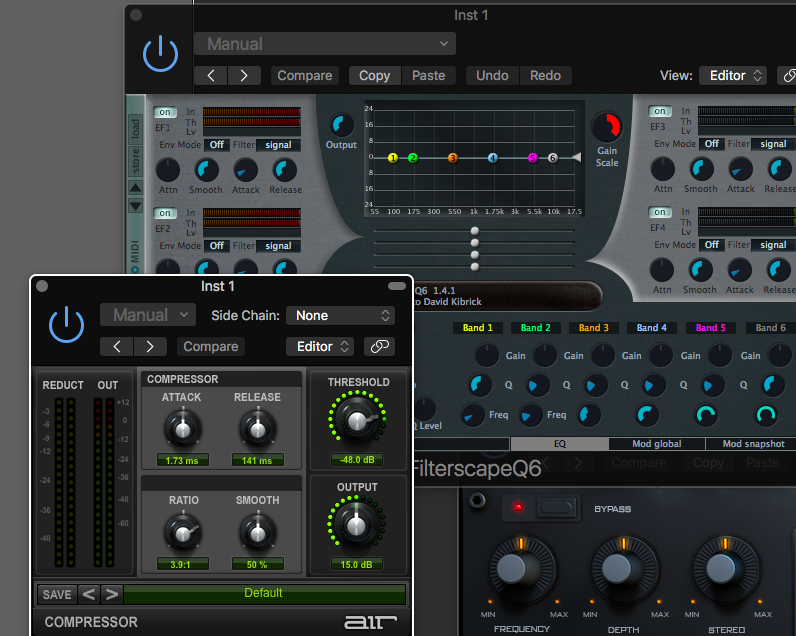
Mixing and Production – Effects & Plug-Ins
In addition to covering the actual programs that are used for production (DAWs), I want to mention some plugins that that can be used to improve your audio during the production process.
First, a bit about plug-ins: there are essentially modules that you can add into your DAW to add additional instruments, effects, processing, and so on. In fact, most DAWs, including most of the ones on this list, come with some built in directly. Looking through most of them, they all seem to have a small suite of effects plugins that will probably do most of what you need for radio production – things like audio analysis, compression, and graphic equalization, as opposed to more “creative” plugins like flangers or phasers used more in music production.
That being said, there is definitely a variety in the included effects for each package: Ardour, for example, has an impressive selection available built-in, while Soundbridge has less of a variety. Because of this, I also wanted to mention some other packs of processors that you can insert into any DAW, either to supplement the effects already included, or to provide you with a standard set of plugins you can learn and use across different DAWs.
While a search for free effects plug-ins can yield many hundreds of individual options, I have come across three major packs of plug-ins that can be installed from one unified installer: the HOFA Basic System (https://hofa-plugins.de/en/plugins/hofa-system/basic/), The Blue Cat Freeware Pack (https://www.bluecataudio.com/Products/Bundle_FreewarePack/), the Melda Productions MFreeFX bundle (https://www.meldaproduction.com/MFreeFXBundle), and (for Windows only) ReaPlugs (https://www.reaper.fm/reaplugs/index.php), a VST port of the plugins that come native with Reaper.
As these are plugin multi-packs, they all include some plugins that probably aren’t that useful for radio, but each of them has some interesting features. If you can run it, ReaPlugs comes with some nice compression plugins, a very flexible multi-band equalizer, and ReaFIR, an FFT processor that is one of the few free plugins that can do noise reduction. The Blue Cat pack also has a nice equalizer, a toolkit for managing gain, and a very capable spectrum analyzer. HOFA Basic comes with a wide range of plugins, including a compressor and equalizer, but has less plugins that are useful for radio and more feature limitations than most. In my opinion, though MFreeFX has probably the best suite of plugins for radio, including multiple audio analysis tools, along with decent compression, equalizers, and filters. (One note is that while the MFreeFX bundle is indeed fully free, there is also an option to extend the plugins with some extra features for ~$60.)
One thing that I’ve found to come in handy in interviews is a device known as a limiter, which will help to avoid audio loudness spikes and keep interview voices at decent loudness levels (it’s also good for protecting your ears and equipment from unexpected noise spikes). There are a variety of free options available, but a nice, simple and easy-to-use option is LoudMax (https://loudmax.blogspot.com). I’ve used it as a quick insert on a number of audio projects and it usually does the trick without having to fiddle with a lot of different settings.
One of the plugin types that can be most useful for radio interviews, especially field recordings, is noise reduction. This is a fairly technical field, and aside from the one mentioned, it can be hard to find noise reduction that is free (although Audacity has some that you can use at the audio-editing stage). For plugins, though, there are some relatively low-cost options: Brusfri by Klevgrand is available for $60 and uses a ducking-based noise reduction approach, and a more traditional and full-featured approach is Izotope RX Elements, which retails at over $100 but often has sales that can occasionally take its price down to $30 or so. There is also the aforementioned ReaFIR, but it does require some technical skills to use it in a noise-reduction capacity.
iOS
iOS generally has a more limited availability of plugins, as developers are still working on developing AUv3 versions of their software that can be loaded into GarageBand and other DAWs (and would otherwise require some of the more involved audio routing mentioned before). That being said, you can get an iOS version of Brusfri for $15, the AudioEffx multi-effect (including parametric equalizer) for ~$10, and the standalone Parametric EQ or Stereo Graphic Equalizer for $5 each.
Conclusion
As you can see, you can have a reasonably professional and productive recording and production setup, using your existing equipment, for little or no cost, with a variety of options to choose from so that you can select the product and workflow that works for you.
Keep in mind that this guide only scratches the surface of what is available in the audio production realm, focusing on some of the more useful free options that I’ve come across. That being said, while there are many that focus more on music production rather than audio/broadcasting, there are a wide variety of free plugins available to do just about anything you can imagine (for an example of just how much is available, you can take a look at this thread: https://www.kvraudio.com/forum/viewtopic.php?f=1&t=177407&start=12990). And if you’re willing to spend money on your studio setup, well… the sky’s the limit, both for capabilities and cost, but some careful research can net you quite a powerful studio or field setup for much less than in the past.
If you have any questions about this guide, you can contact me at: david (a t) ksqd (d o t) org. I use my own production setup for music more than I do broadcast audio, and I also have a good bit of knowledge regarding music-oriented instruments and effects, and I’m happy to offer some suggestions there too if you’re interested.
Additional Links
Another great resource for learning about broadcast audio is transom.org, which provides reviews of different types of audio and podcasting/broadcasting equipment (https://transom.org/topics/tools/). A good companion to this guide that goes more in-depth on certain issues is their Podcasting Basics, series, especially parts 1 (https://transom.org/2015/podcasting-basics-part-1-voice-recording-gear/) and 2 (https://transom.org/2015/podcast-basics-part-2-software/). Keep in mind, though, that a number of the options they feature are considerably more expensive than what is covered in this guide.
Some additional resources for studio setups and audio-processing plugins:
(A free windows-based software studio – https://www.kvraudio.com/forum/viewtopic.php?f=74&t=343187)
(Free VST Plugins and Software – https://bedroomproducersblog.com/free-vst-plugins/)
(Free VST archives – http://www.vst4free.com)
Also, if you have an older laptop, another option (beyond the scope of this guide) to repurpose it as an audio studio is to install a Linux distribution designed for audio and multimedia productions, such as the following:
(Ubuntu Studio – http://ubuntustudio.org/about-ubuntustudio/)
(KXStudio – http://kxstudio.linuxaudio.org)
(AVLinux – http://www.bandshed.net/avlinux/)
(64 studio – https://linux.softpedia.com/get/System/Operating-Systems/Linux-Distributions/64-Studio-4412.shtml)